Parmar D, Mackenzie L, Bonsor SJ The art of clinical shade matching of resin-based composite materials. Aesthet Update. 2024; 1:113-120 https://doi.org/10.12968/aedu.2024.1.3.113
Ongul D, Sermet B, Balkaya MC Visual and instrumental evaluation of color match ability of 2 shade guides on a ceramic system. J Prosthet Dent. 2012; 108:9-14 https://doi.org/10.1016/S0022-3913(12)60102-4
Gracis S, Thompson VP, Ferencz JL A new classification system for all-ceramic and ceramic-like restorative materials. Int J Prosthodont. 2015; 28:227-235 https://doi.org/10.11607/ijp.4244
Cesar PF, Miranda RBP, Santos KF Recent advances in dental zirconia: 15 years of material and processing evolution. Dent Mater. 2024; 40:824-836 https://doi.org/10.1016/j.dental.2024.02.026
The art of clinical shade matching of indirect restorative materials. Part 3 Stephen J Bonsor Dipesh Parmar Louis Mackenzie Aesthetic Update 2025 2:1, 15-20.
Authors
Stephen JBonsor
BDS(Hons) MSc FHEA FDS RCPS(Glasg) FDFTEd FCGDent, GDP
BDS(Hons), MSc, FHEA, FDS RCPS(Glasg), FDFTEd, FCGDent, GDP, Teviot Dental Practice, Hawick; Programme Director/Senior Clinical Lecturer, University of Edinburgh
In order to deliver fixed or removable prostheses to match the surrounding natural dentition as accurately as possible, both the clinician and dental technician must be aware of the factors that may affect the optical properties of the substrates, and hence the selection of the most appropriate shade. The present article is concerned with reviewing how the shades of the artificial teeth or fixed prostheses may be chosen most predictably, offering tips as to how this may be achieved and emphasizing good communication between clinician and dental technician.
CPD/Clinical Relevance: The art of shade matching is a fundamental clinical skill in restorative dentistry to ensure that the best possible aesthetic outcome is achieved when working with indirect restorative materials such as ceramics and acrylics.
Article
The present article will provide an overview containing practical recommendations on how to predictably and accurately shade match to the natural dental hard tissues when working with indirect restorative materials such as ceramics and acrylics.
The present article is the third of a series of three. The first was concerned with the physics behind the art of shade determination and illustrated how this underpins clinical practice.1 The second article described in detail how to get the best results when shade matching using a resin-based composite.2 The reader is recommended to review these publications that provide context and fundamental information, which underpins much of the subject matter covered in this article. The present article examines in depth how indirect restorative materials, such as ceramics and acrylics, may be accurately and predictably matched to complement the dental hard tissues of the adjacent teeth. In addition, an imperceptible transition between the natural tooth tissue of the tooth being restored and perhaps the gingival tissues with the fixed or removeable prosthesis is also required.
Shade guides used when prescribing shades for indirect restorative materials
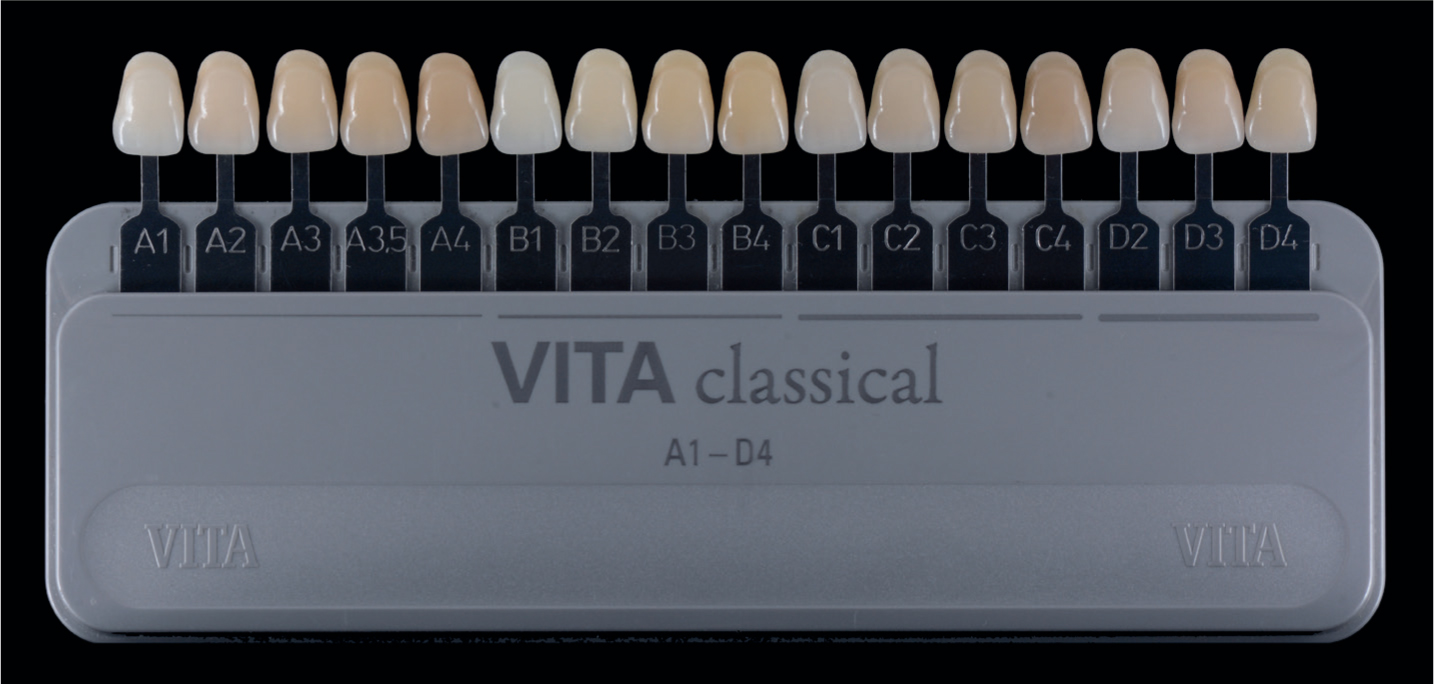
Both of the previous articles in this series discussed the Vita Classical shade guide (Vita Zahnfabrik, Bad Säckingen, Germany) in the context of its importance because it was the first shade guide to be introduced to market in 1956, and has become ubiquitous ever since (Figure 1).
Figure 1. The Vita Classical shade guide (Vita Zahnfabrik).
There are several shortcomings with this particular shade guide:
The material from which the tabs are constructed is of a different material (acrylic) to the one being matched (for example, resin composite or ceramic) meaning that it is virtually impossible to match accurately such dissimilar materials.
There is no scope to match the various and numerous optical nuances that natural teeth exhibit because the colour distributions within each tab is not natural.
The shade tab itself varies in chroma from the neck to the incisal edge making it difficult for clinicians to choose the part of the shade tab that matches closest. This is also a problem with many other shade guides.
The tabs on the shade guide are arranged with respect to their different hues (A–D) and in varying chroma levels (1–4) which, in the opinion of many clinicians, is neither logical nor user-friendly.
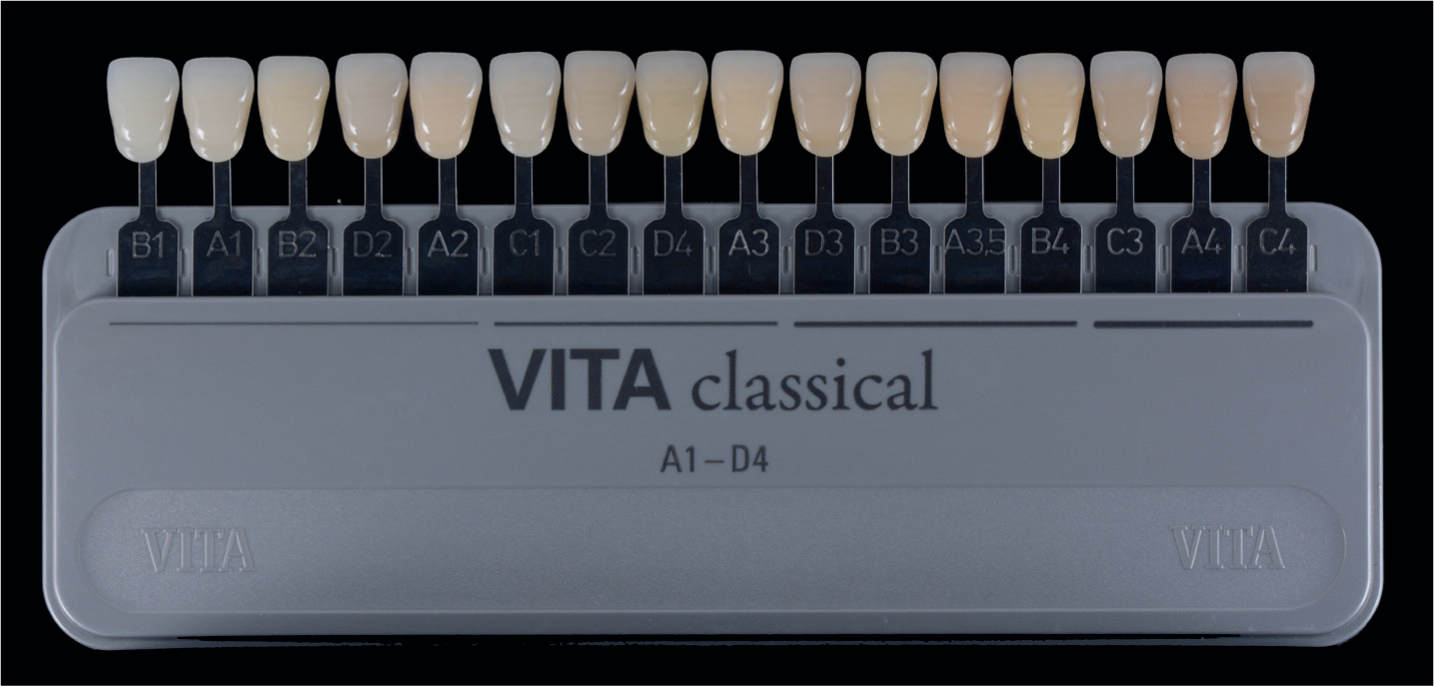
In an attempt to address the last point, it has been suggested to order the shade tabs in preference of their value. It is said that matching shades in terms of value is easier to visualize than hue and chroma, and such an order can be seen in Figure 2.
Figure 2. The Vita Classical shade guide (Vita Zahnfabrik) with the shade tabs rearranged in respect of their value.
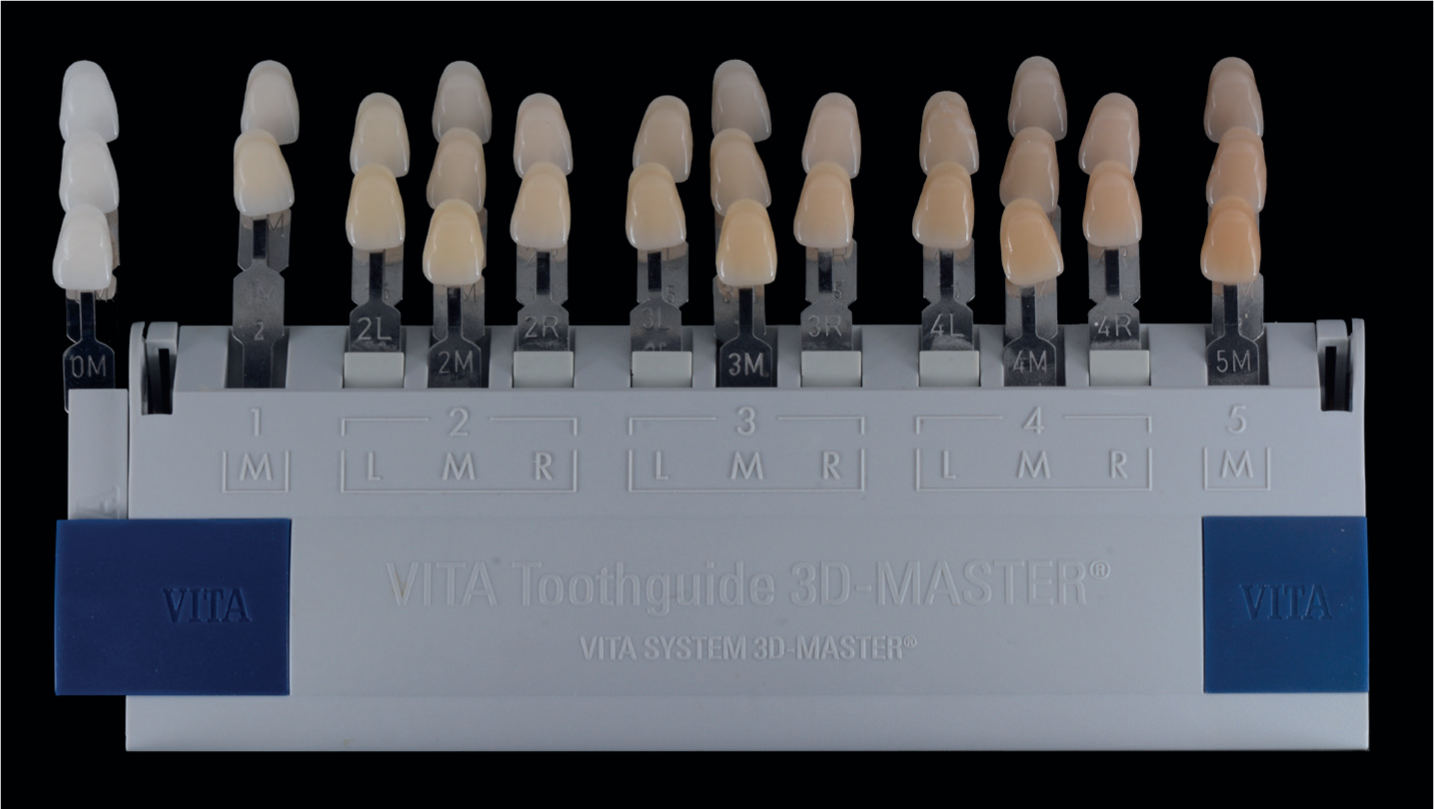
Although this might facilitate shade taking to a degree, it does not really overcome the shortcomings of this shade guide. In 2001, the VitaPan 3D Master (Vita Zahnfabrik) shade guide was introduced to the market. It is in fact value based and, as such, it is considered to have increased clinical relevance to the range and distribution of tooth colours (Figure 3), offering the ability to shade match more accurately.3
Figure 3. The VitaPan 3D Master (Vita Zahnfabrik) shade guide.
Each shade tab is denoted by three digits, for example, shade 3M1 denotes 3 value, M hue and 1 chroma. It is recommended that the clinician selects the group of tabs that most closely match the value of the tooth or adjacent teeth to that being restored. The central three shade tabs in the case of 2, 3 and 4, or 1 or 5 in the case of a pair of tabs are then selected. This will then guide the clinician in selecting the shade tab that most closely matches the shade of the tooth being determined in terms of hue and chroma.
Still, to this day, the Vita Classical shade guide (Vita Zahnfabrik) predominates with not all clinics or dental laboratories having yet adopted the VitaPan 3D Master (Vita Zahnfabrik) shade guide. It is possible to convert shades from one to the other with the help of a conversion table, which is shown in Table 1.
Vita Classical
VitaPan 3D Master
-
Bleach shades
B1
1M1
A1
1M2
B2
4L2.5
D2
3M1/3M2
A2
2M2
C1
3M1/2R1.5
C2
3L2.5
D4
3L1.5
A3
3M2/3M3/2R2.5
D3
4M1
B3
3L2.5
A3.5
3M3/4M2
B4
3M3
C3
4L1.5/4M2
A4
4L2.5
C4
5M2
The fact that some shade tabs in the Vita Classical (Vita Zahnfabrik) shade guide correspond to more than one shade in the VitaPan 3D Master (Vita Zahnfabrik), demonstrates the increased versatility and accuracy to capture shade nuances by the latter shade guide. This may explain why it is favoured by many clinicians in contemporary practice.
Shade guides for cores
With the advent and increasing usage of all-ceramic restorations that may permit the shade of the preparation to be seen through the restoration, shade guides have come to the market that are intended to relay the optical properties of the prepared underlying tooth tissue, the ‘stump’ or ‘core’, to the dental technician. This is critical in terms of achieving the best aesthetic result as the shade of the underlying preparation will inform the selection of the most appropriate shade of ceramic in terms of translucency or opacity. Clearly, a darker shade of the preparation will determine that a ceramic of an increased opacity will be required so that the shade of the underlying tooth tissue is masked. Failure to do this will result in shine-through, so having a detrimental effect on the optical properties of the definitive restoration. In the same manner that a shade guide can be used to determine the shade of the tooth, an appropriate shade guide can be used to determine the shade of the prepared tooth (Figure 4).
Figure 4. The IPS Natural Die Material shade guide (Ivoclar Vivadent, Schaan, Liechtenstein) is used to determine the shade of the underlying tooth tissue thus informing the selection of the ceramic material in terms of opacity or translucency.
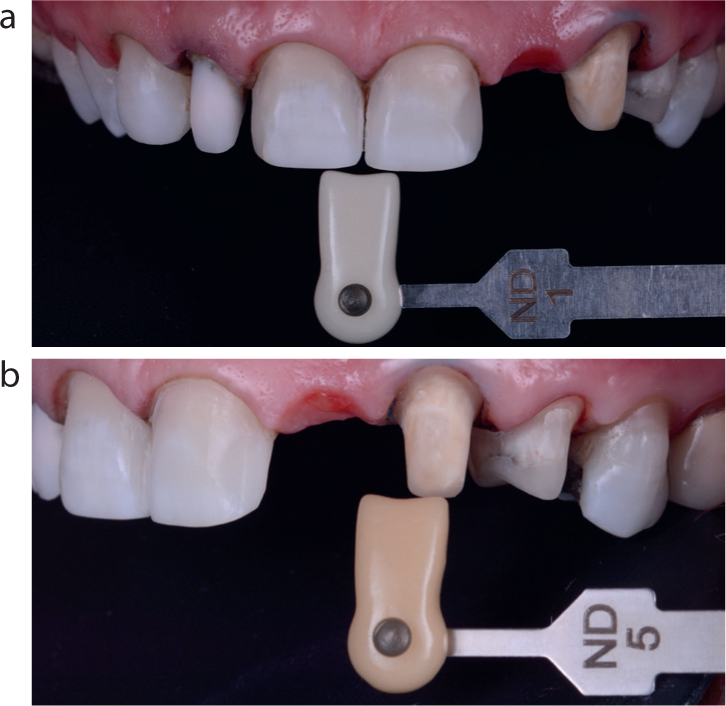
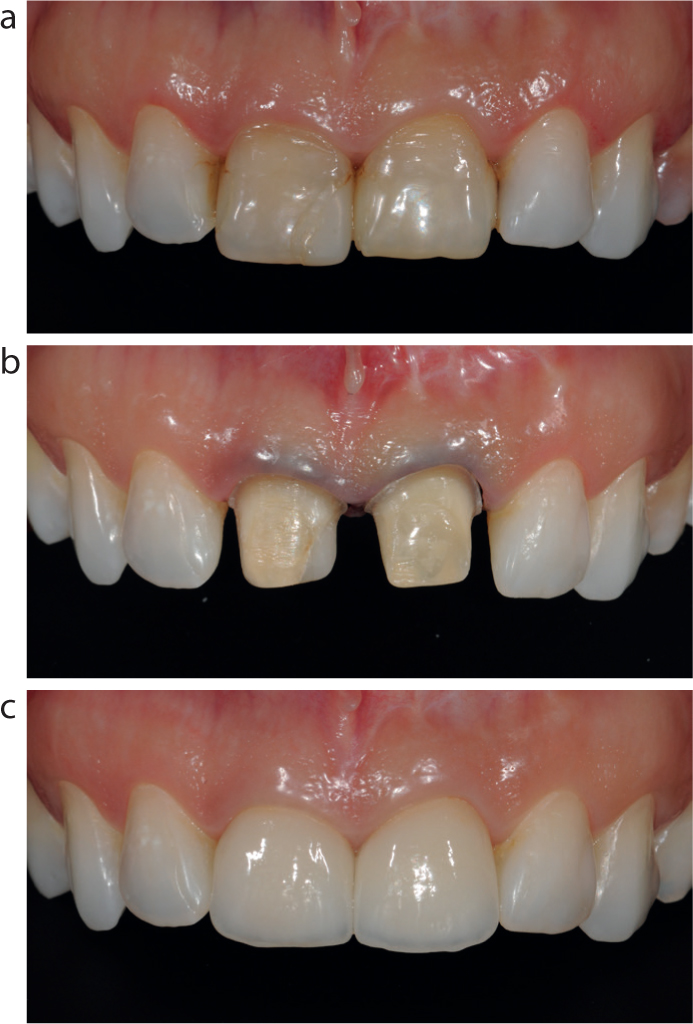
As shown in Figure 5, the shade of core should be communicated to the dental technician to inform the selection of the appropriate opacity of the core of the all-ceramic restoration so preventing shine-through of the underlying tooth structure.
Figure 5.
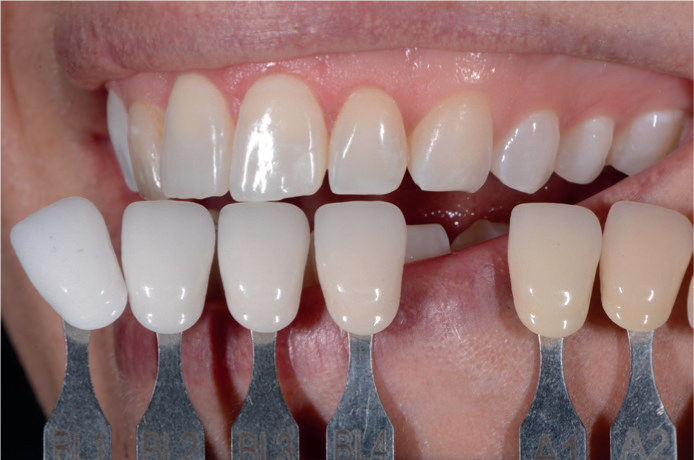
(a,b) The taking of the shade of the preparation, the so-called ‘core shade,’ is essential in order that the dental technician can select the most appropriate ingot of material from which to mill the (core of the) restoration. As with the shade determination of the tooth, the clinical photograph should also be sent to the technician, preferably including the core shade tab in the picture as illustrated. In this case, the two upper central incisors were prepared for lithium disilicate veneers while the upper left canine was planned to be the abutment for a conventional two-unit cantilever all-ceramic bridge.
The optical properties of the indirect restorative materials
The general demarcation with respect to material choice for indirect prostheses is whether the restoration is fixed or removable, in other words composed of a ceramic material in the case of the former and an acrylic with the latter.
Materials in relation to fixed indirect restorations
In order to understand how to accurately shade match, a knowledge of the various types of ceramic materials is essential. A classification of the currently available products was proposed by Gracis et al. in terms of the matrix of the ceramic material be it glass, polycrystalline or resin based.4 This paper is to be commended because it neatly categorizes ceramic materials, providing the reader with the ability to understand their structure and properties. and thus how they may be prescribed to be used clinically. In contemporary practice, two ceramic materials predominate, namely lithium disilicate and zirconia. Traditionally, lithium disilicate provided the best aesthetics, whereas zirconia was selected when high-strength properties were required because it was notoriously opaque. Should aesthetics be the principal consideration, most clinicians would prescribe lithium disilicate; however, the drawback is that its mechanical properties are inferior when compared to zirconia. However, owing to recent developments in materials science in respect to these materials, this broad generalization is now no longer valid as is explained later in the present article.
Should there be reason to choose zirconia, for example to mask a discoloured preparation, then traditionally a zirconia core of 3Y-TZP (3 mol.% yttria-stabilized tetragonal zirconia polycrystals) was constructed to afford strength to the crown to then be veneered using a feldspathic ceramic to provide the required aesthetics. When such a prosthesis is constructed, there is potential for delamination between these two substrates and so attempts have been made to reduce this shortcoming. In order to increase the translucency of zirconia, the concentration of the doping agent, yttria, has been increased from the original 3Y-TZP to 4 mol.% 4Y-TZP and 5 mol.% 5Y-TZP. There is a resultant decrease in the alumina content, and so an accompanying decrease in its mechanical properties.5 The main manufacturing method of construction is the CAD/CAM milling of the fixed indirect restoration from discs of optimized material. The original discs were monochromatic, but recent advances in technology have produced laminated discs. These consist of the more fracture-resistant 3Y-TZP at the base (core) with the more translucent 5Y-TZP on the opposite side of the disc thus forming the outer layer of the final restoration. The potential for defects to be incorporated between the layers has been overcome by the use of a novel powder compaction technology.5
As mentioned earlier, lithium disilicate traditionally provided the best aesthetic results and so was favoured for restorations in the anterior zone. However, it tended to be translucent in nature, and that could be problematic for the dental technician with a darker tooth preparation. Developments in the material have led to the production of more opaque shades capable of masking-out discoloured preparations where zirconia would have been selected traditionally (Figure 6).
Figure 6.
(a–c) Heavily restored and discoloured upper central incisors were to be restored with all-ceramic crowns. A high opacity lithium disilicate block was chosen to construct the coping, milled and built-up using a feldspathic ceramic in order to construct the definitive crown. (Laboratory work carried out by Dental Suite One, Solihull, UK.)
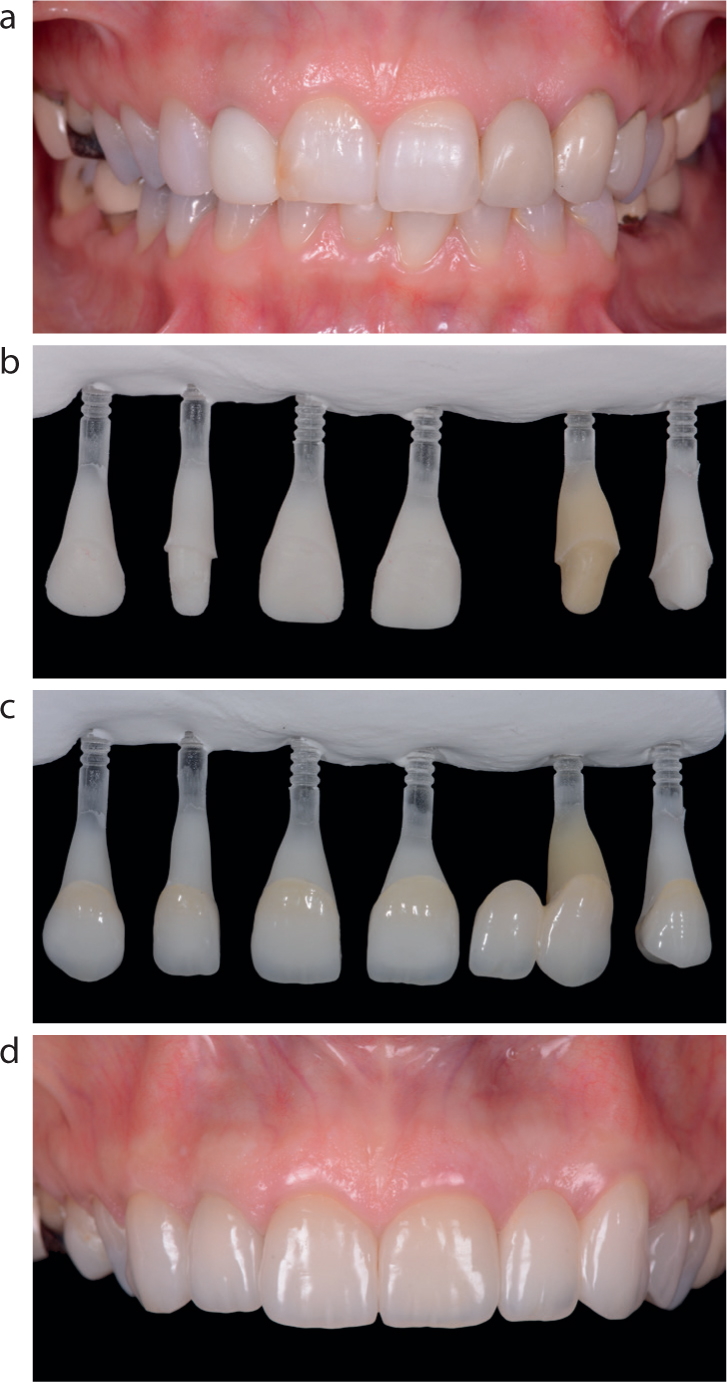
Owing to their differing properties as described earlier, it is also challenging to match dissimilar ceramic materials. In general, for best aesthetic outcome, the same material should be used when a number of units are being constructed. However, this can be challenging when different types of restorations are being envisaged, for example veneers and crowns, and very often with differing stump shades. To deliver the best aesthetic outcome to overcome this problem, following the determination of the shade of the prepared tooth, coloured dies are constructed by the dental technician to simulate the shades of the preparation stumps so that the correct shade of the all-ceramic restorations may be selected. Such a case is illustrated in Figure 7.
Figure 7.
(a) Pre-operative photograph showing the UR3 to UL4 inclusive to be restored with all-ceramic restorations. As can be seen UR2 and UL4 will receive crowns, UL3 is the abutment of a two-unit bridge and the other teeth will be restored with labial veneers. (b,c) Dies are constructed with a resin material to simulate the optical properties of the underlying abutment teeth. The definitive restorations are then seated on the dies to demonstrate the final optical result of the fitted all-ceramic restorations. (d) The fitted restorations are shown in the post-operative photograph.
For those patients who have undergone a course of treatment to bleach their teeth, it may be necessary to use a shade guide with tabs corresponding to the post-operative bleaching shades as seen in Figure 8. Such shade guides are now widely available.
Figure 8. A shade guide (Ivoclar Vivadent) with tabs corresponding to teeth that have been bleached.
Materials in relation to removeable prostheses
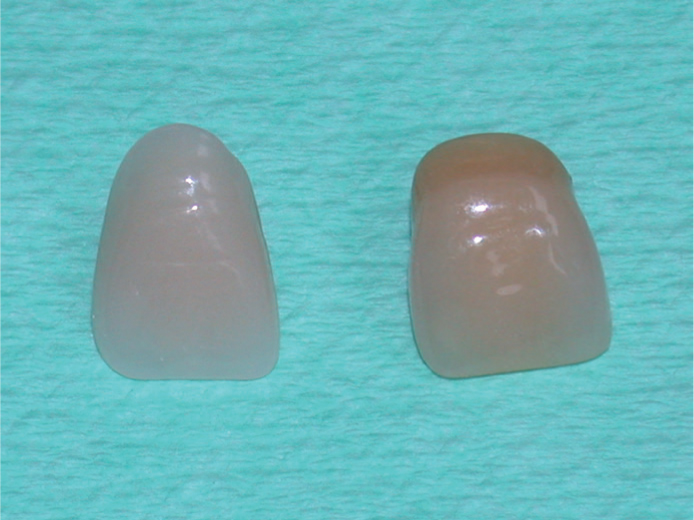
The original teeth incorporated into a removable denture were constructed of ceramic.6 While the aesthetics were satisfactory, there was a certain ‘chatter’ noise during use and the teeth could not be bonded to the denture base leading, on some occasions, to their loss. In contemporary practice, most denture teeth are composed of acrylics such as polymethylmethacrylate (PMMA).6 These can be monochrome (one shade injected into a mould) or layered for optimal aesthetics.6 The latter should be chosen when the case demands the best aesthetic outcome (Figure 9).
Figure 9. An example of a monochrome denture tooth (on the left) and one constructed in layers, SR-Vivodent PE (Ivoclar Vivadent). Note the difference in the aesthetics between the two denture teeth.
Shade matching in removable prosthodontics
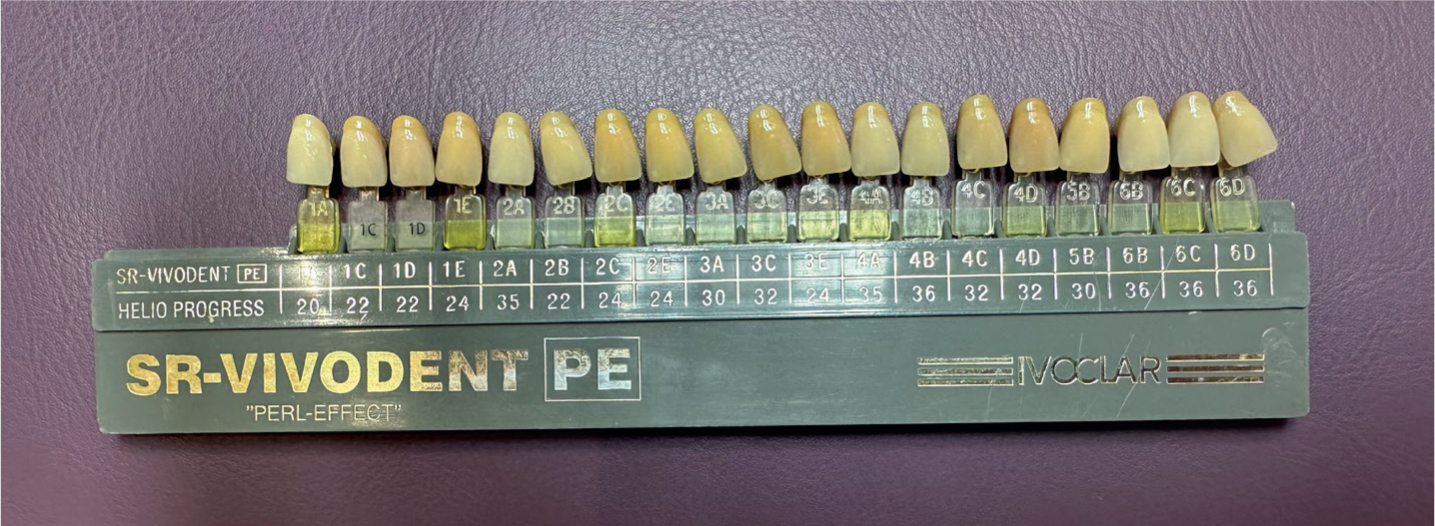
As with fixed prostheses, shade guides are available to shade select teeth when removable prostheses are being constructed. An example is shown in Figure 10.
Figure 10. The SR-Vivodent PE shade guide (Ivoclar Vivadent) indicated for use when matching to this brand of teeth.
The corresponding shade guide should be selected for the brand of denture teeth envisaged to be used in the case. As previously mentioned, it is desirable that the shade tabs are constructed out of the same material as the denture teeth, which commonly happens with such shade guides.
Multidisciplinary cases
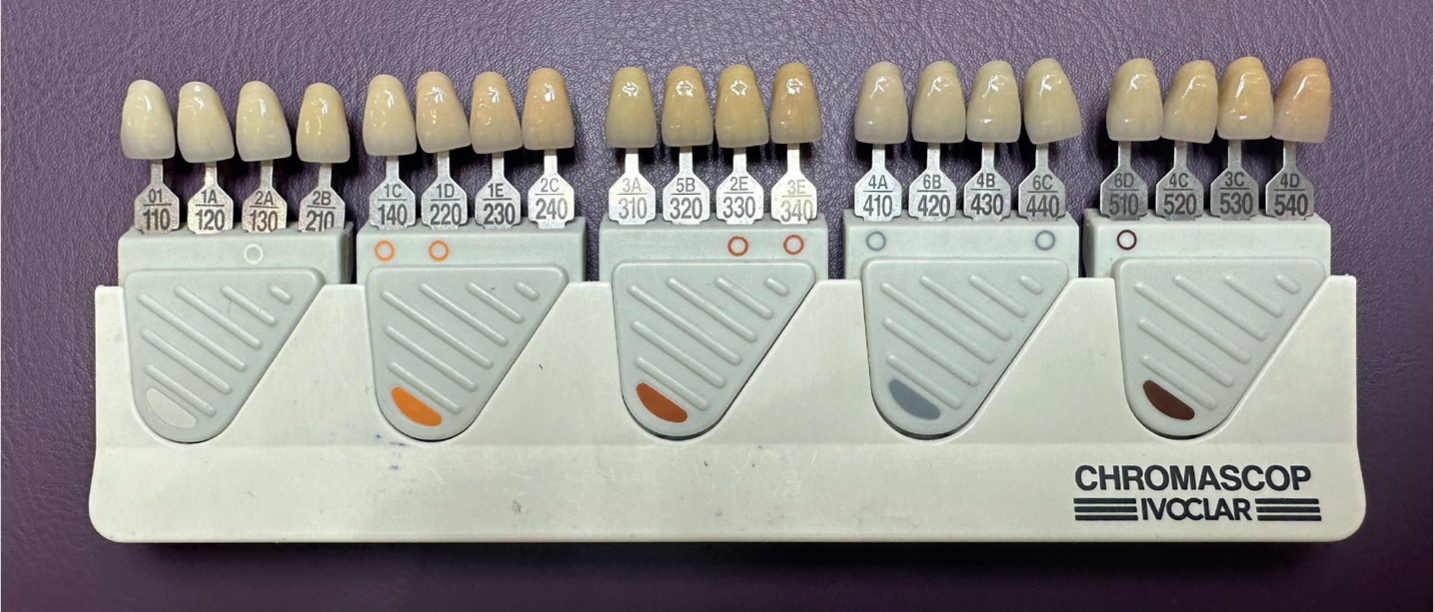
As illustrated with the shortcomings of trying to shade match with dissimilar materials, multidisciplinary cases involving the restoration constructed of ceramics, for example fixed restorations and removable prosthesis in the form of acrylics also pose a significant clinical problem stemming back to attempting to match dissimilar materials. Some manufacturers have tried to address this issue by designing bespoke shade guides. One such shade guide, Chromascop (Ivoclar Vivadent) shade guide is pictured in Figure 11.
Figure 11. The Chromascop (Ivoclar Vivadent) shade guide used when ceramic and acrylic are being used in the same case in an attempt to deliver the best aesthetic outcome.
The tabs on this shade guide have two reference numbers, for example 1E and 230. The former relates to the shade of the denture tooth and the alter the corresponding ceramic shade. As both substrates are constructed by the same manufacturer, they can control the aesthetics so that the dissimilar materials can be as close as possible in terms of their appearance thus potentially overcoming the problem of matching dissimilar materials.
Shade matching soft tissue
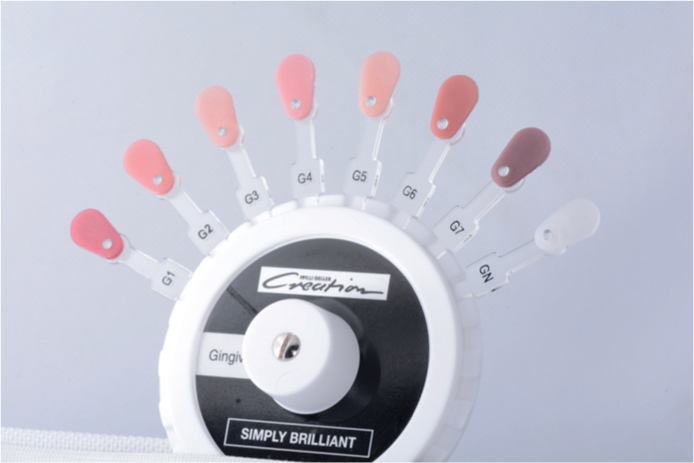
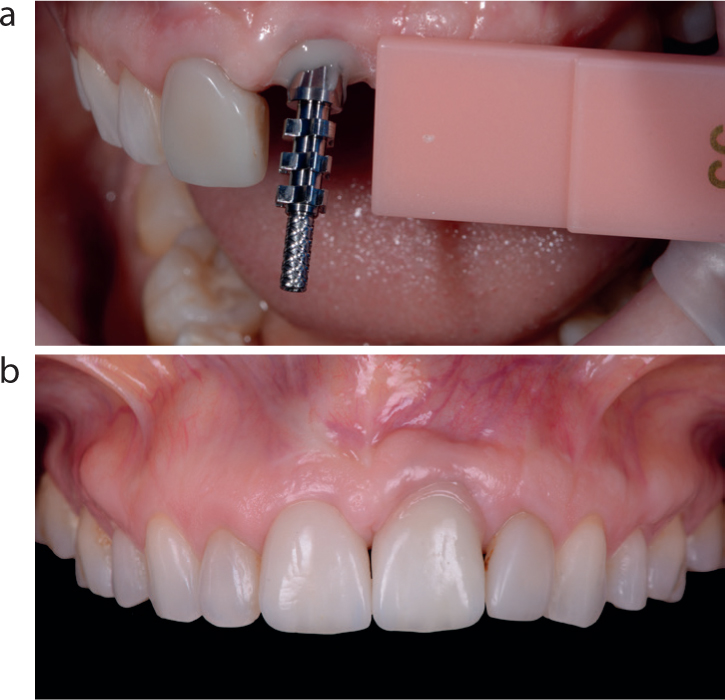
In cases involving the loss of hard and soft tissues, it is sometimes not possible to reconstruct the lost tissues using surgical methods, which is often the case where a tooth is being replaced. A possible solution is to attempt to camouflage defects using ceramics that match the gingival tissues. Shade guides are available to allow the technician to determine the shade of the gingival tissue to replicate in the prosthesis (Figure 12), with a clinical case illustrating the process in Figure 13. However, in practice, it is notoriously difficult to achieve a good aesthetic result with gingival shaded ceramics.
Figure 12. An example of a commercially available gingival shade guide (Simply Brilliant, Creation Willi Geller, Alsip, IL, USA).Figure 13. A gingival shade guide tab may be used to determine the shade of soft tissue that needs to be recreated prosthetically. In this case, the fitted screw-retained implant prosthesis to restore UL1 has had pink ceramic added in the cervical area in an attempt to mask the hard and soft tissue loss and to allow the tooth-coloured ceramic to match the proportions of UR1. (Laboratory work by Fine Art Dental Studio, Birmingham.)
Clinical photography
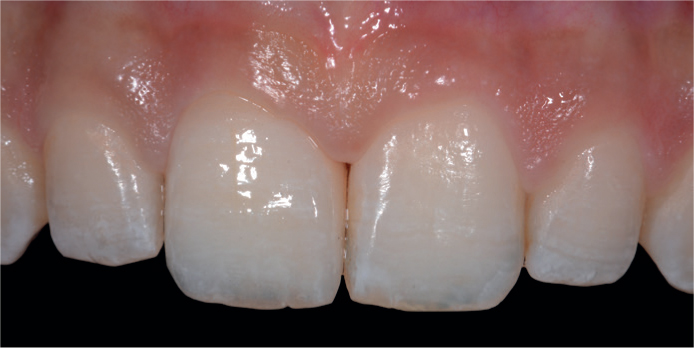
As discussed in the second article of this series,2 the use of high-quality clinical photography can be invaluable in helping to determine an exact shade prescription when working with resin-based composite materials. The reader is directed to that article for more detailed information on settings for clinical cameras and advice on techniques for use.2 This is also the case for dental ceramics. The use of clinical photography is invaluable in terms of allowing the dental technician to see the nuances and characterizations of the natural teeth of the patient, thus allowing them to incorporate such detail into the restoration being constructed to achieve the best aesthetic result (Figure 14).
Figure 14. A close-up clinical photograph of an all-ceramic crown on UR1 demonstrating the nuances and characterizations which have been incorporated in order to match those seen in the natural UL1.
Good quality pre-operative views are extremely helpful. Full face, ‘natural’ smile, retracted view with the teeth in the intercuspal position and a retracted view with the teeth slightly apart should be taken with an appropriate clinical camera set-up. In addition, close-up views should also be taken. It is advised that the shade tab(s) are pictured adjacent to the teeth in the clinical photograph. It is useful to have the shade tab that matches the closest alongside one tab lighter and one tab darker. This is to provide the dental technician with a context should the white balance differ, thus allowing them to retrace their steps (Figure 15).
Figure 15. Shade tabs should be included in the clinical photograph together with the shade tab reference being visible thus giving the dental technician additional invaluable information.
Communication
Communication with the dental technician is a critical consideration and much neglected. It would be ideal for the dental technician to be present in surgery with the clinician and the patient to be involved in and to advise on the shade match exercise. In practical terms, this is often a luxury and not available to most clinicians. Clinical photography can help to overcome this shortcoming to play a significant role in facilitating excellent communication between the clinic and dental laboratory. The ready accessibility of email and file-sharing platforms makes it easy to send clinical photographs to the laboratory from the clinic. These images are immeasurably more useful than the clinician drawing a pencil diagram on the laboratory prescription. Furthermore, with digital techniques increasingly coming to the fore in dentistry, a pencil drawing is, by definition, obsolete.
Clinical techniques for indirect shade matching
The fundamentals of shade matching in the clinic were discussed in detail in Mackenzie et al1 and the reader is directed to this article. In addition, in relation to the matching of ceramic materials, the following general advice is offered by means of a summary:
The most appropriate shade guide for the material to be matched should be selected. Ideally, this should be chosen by the dental technician.
Initially, the whole shade guide should be viewed adjacent to the teeth and then moved left/right to determine value.
The three or four closest shade tabs should be selected before beginning a process of elimination.
The middle third of the subject or adjacent tooth should be used to determine basic shade, as colour typically ranges from the cervical to the incisal areas and a general decrease in chroma and hue is usually seen.
Clinical photography should be used as much as possible: pre-operative views, intra-operative views and incorporation of the chosen shade tab into the photograph is immeasurably helpful.
Raw lighting should be used with consideration being given to using cross-polarized images to highlight internal characterizations for the technician to match.
Core or stump shades should be chosen and communicated to the laboratory by means of clinical photography.
Lastly but critically, the patient most certainly should be involved in the process because their views are vitally important. As a result of their input, the clinician may need to manage expectations and offer explanations.
Conclusion
In order to deliver the best aesthetic results using dental ceramics in the case of fixed restorations and acrylics in removable prostheses, the dentist and dental technician should consider a number of factors as outlined in this and, indeed, the two previous articles in this series. The use of the most appropriate shade guide, clinical photography and excellent communication between colleagues will result in the best aesthetic outcome for the patient.