This second article in the two-part series on wax carving provides a step-by-step guide focusing on the coronal anatomy of whole posterior teeth. The exercises are primarily designed to help clinicians simulate and master the carving and shaping of extensive dental amalgam and posterior resin composite restorations, as well as for use in designing fixed and removable prosthodontic restorations.
CPD/Clinical Relevance: Knowledge and understanding of the anatomy of posterior teeth is a key skill in dentistry.
Article
As the key aims of restorative dentistry are to restore the form, function and aesthetics of damaged teeth, it is important that clinicians have detailed knowledge and understanding of the three-dimensional anatomical shapes of posterior (and anterior) teeth.
The following step-by-step guide has been developed over a 14-year period for teaching undergraduate and postgraduate tooth anatomy at the University of Birmingham School of Dentistry, where it is used alongside tooth drawing exercises.1 The materials, equipment and waxing and carving techniques described in part one are now applied to the whole crown of a mandibular right first permanent molar (LR6).2 The same protocol may then be repeated for all other molar and premolar teeth.
Waxing-up technique
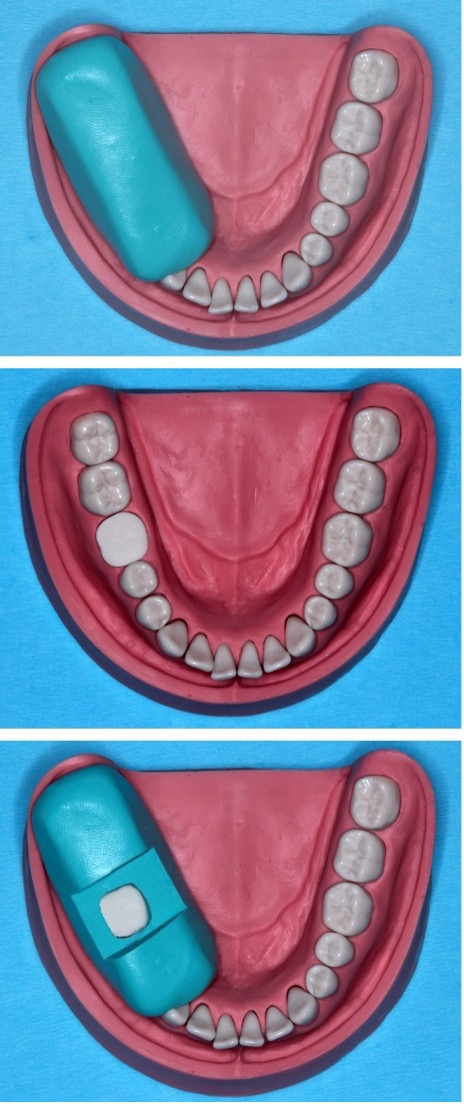
Take a silicone impression of the sextant containing the tooth to be waxed-up, LR6 in this example (Figure 1a).
Once set, remove and prepare the subject tooth by decoronating 1.0–2.0 mm supragingivally, using a suitable bur (Figure 1b).
Prepare an occlusal window in the silicone template using a scalpel as shown (Figure 1c).
Specialised carving wax is recommended, and is available in a range of colours (Yeti IQ wax; Bracon Dental Laboratory Products, East Sussex, UK). The green version provides clear definition of carved fissure patterns.
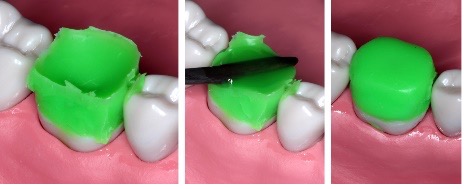
Place an initial increment of (unheated) wax into the template (Figure 2a).
Melt the wax in situ using a heated instrument (such as an Ash 5, available from various suppliers). Ensure that the initial increment is well adapted to the LR6 cavity (Figure 2b).
Add and heat further increments to create a homogeneous mass, without layers/voids (Figure 2c).
Remove (and retain) the silicone template and heat the occlusal excess to create a slightly overbuilt LR6 wax-up. Tidy the marginal wax ready for carving, correct the bucco-lingual width, and remove excess from adjacent marginal ridges where necessary. Allow the wax to set hard before carving (>10 minutes) (Figure 3).
Figure 2.
(a–c) Waxing-up LR6.
Figure 3.
(a–c) Shaping the LR6 wax-up.
Step-by-step carving technique
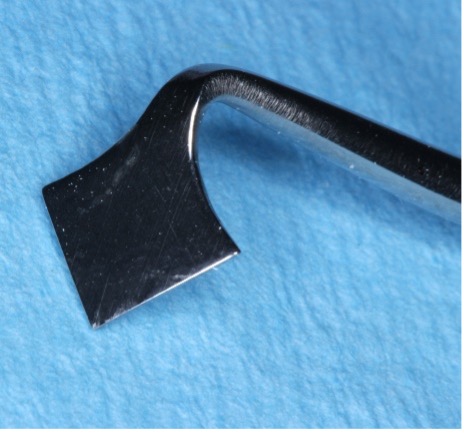
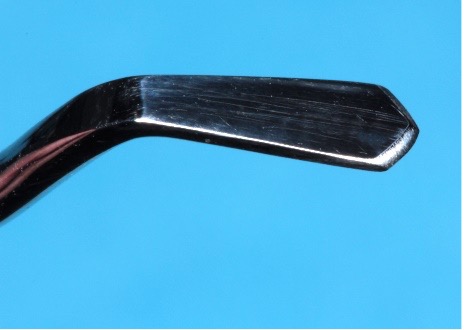
For the initial carving, a Frahms carver is recommended. This inexpensive instrument is available from various suppliers (Figure 4). A half Hollenback carver and a discoid-cleoid carver are also recommended. All these instruments are ideal for clinical use when amalgam carving. If a Frahms carver is not available then an alternative instrument, for example a Wards carver, may be modified into a similar pattern using composite finishing discs (Figure 5).
Figure 4.
Occlusal carving tip of a Frahms carver.
Figure 5.
Modification of a Wards carver to form an occlusal carving tip.
When wax carving for the first time, it is recommended to ‘map out’ the fissure pattern using a probe, or another suitably sharp instrument.
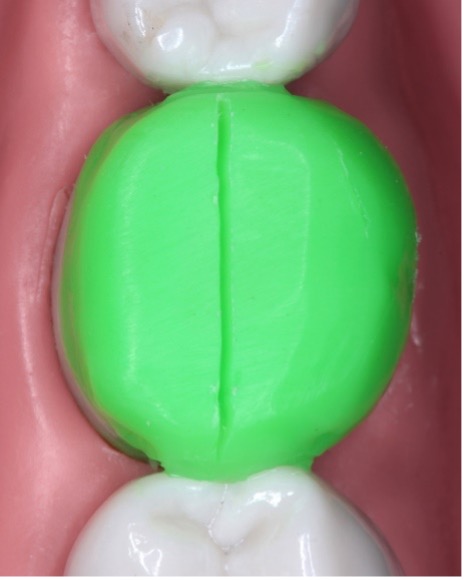
Mark the midline fissure slightly lingual to the middle of the LR6 wax-up, using the centre of the marginal ridges of the adjacent teeth as an orientation guide (Figure 6). For all posterior teeth the midline fissures are similarly positioned lingually.
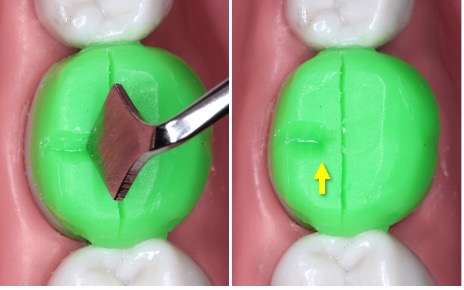
Divide the lingual occlusal surface in half (Frahms carver) (Figure 7a).
Carve to anatomical depth using the fissures of an adjacent or contralateral tooth as a guide. Stop the lingual lateral fissure just short of the midline fissure as shown (Figure 7b).
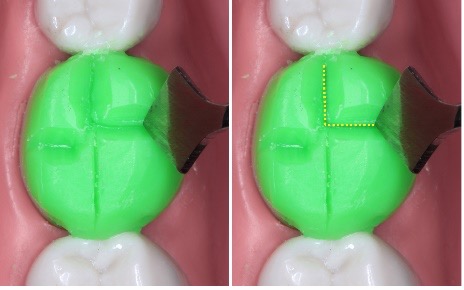
Carve the mesial part of the midline and mesio-buccal lateral fissures in an ‘L-shape’ (Figure 8a). The buccal lateral fissure should extend onto the buccal axial surface and be parallel and slightly mesial to the lingual lateral fissure (Figure 8b).
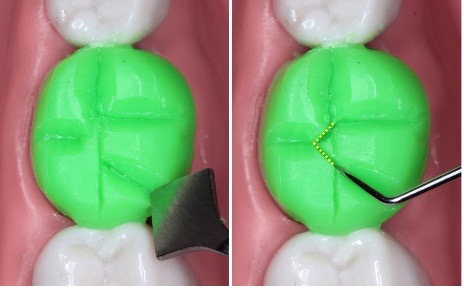
Carve the disto-buccal lateral fissure (Figure 9a). Shape the central fossa of the LR6 so that the centro-buccal cusp outline crosses the midline and contacts the lingual lateral fissure. The Y-shape created is characteristic of lower first permanent molars and is known as a dryopithicus fissure pattern (Figure 9b).
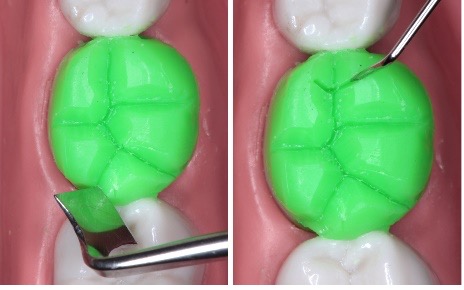
Carve the mesial marginal fissures, ensuring that they do not cross the marginal ridge (Figure 10a). The distal marginal fissure can extend across the marginal ridge and should be orientated lingually as shown (Figure 10b).
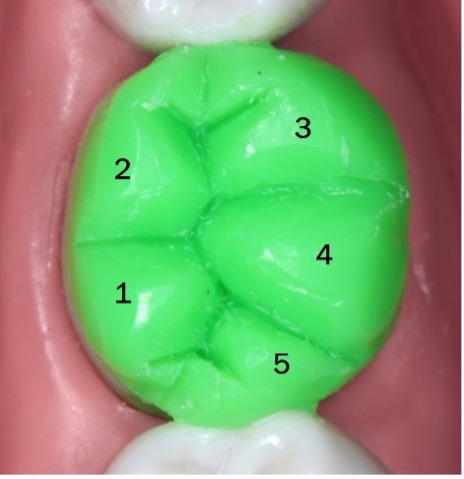
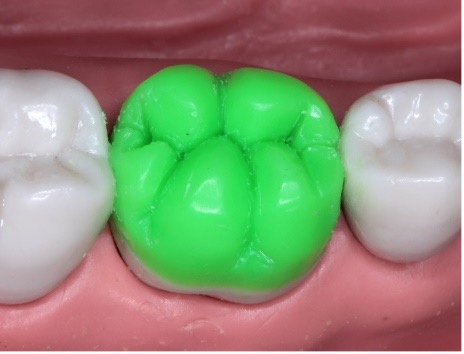
Carve the five individual cusps with a half Hollenback carver (or equivalent), using the blades at different angles to create convex/rounded cusp ridges (Figure 11). Use the fissure pattern as a distinct boundary when carving each cusp. The disto-lingual (1) and mesio-lingual (2) cusps should be similar in size. The centro-buccal cusp (4) should be the largest and cross the midline to intersect between the lingual cusps. The disto-buccal cusp (5) is the smallest, and is known as the hypoconulus. All cusp ridges should be orientated towards the centre of the occlusal surface at approximately 45°
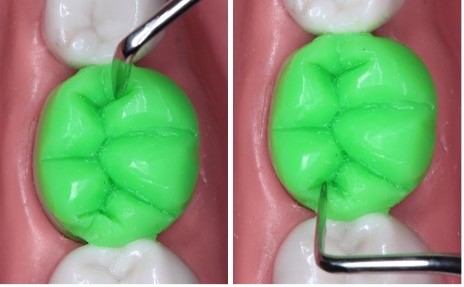
Using a half Hollenback carver, or the cleoid (claw) tip of a discoid-cleoid carver, carve the mesial and distal triangular marginal fossae (Figure 12). Preserve the integrity of the marginal ridges.
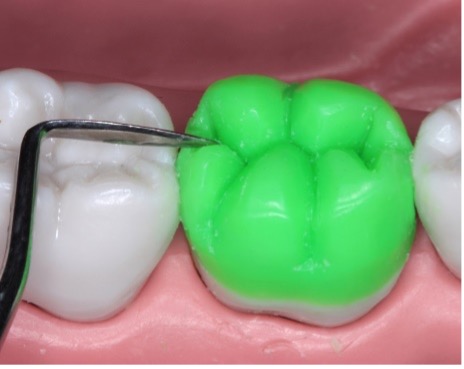
Carve the mesial and distal marginal ridges so that they are equivalent in height to those of the adjacent teeth.
Carve a marginal groove across the centre of the mesial marginal ridge. There should be a similar dip at the centre of the distal marginal ridge.
Bevel the buccal cusp so that the axial contour follows that of the adjacent molar tooth (Figure 14). The lingual axial surface should be vertical with a slight bevel at the occluso-axial line angle. Again, use adjacent/contralateral teeth as a guide.
Refine the primary anatomy to create five distinct cusps (Figure 15):
Mesial, central and distal fossae;
Dryopithecus fissure pattern;
Distinct mesial and distal marginal ridges;
Two buccal axial grooves;
A central (shallow) lingual axial groove
Figure 6.
Midline fissure.
Figure 7.
(a,b) Lingual lateral fissure.
Figure 8.
(a) Mesial midline and (b) lateral fissures.
Figure 9.
(a) Disto-buccal lateral fissure and (b) central fossa.
Figure 10.
(a,b) Marginal fissures.
Figure 11.
LR6 five cusps.
Figure 12.
(a,b) Marginal fossae.
Figure 13.
Marginal ridges.
Figure 14.
(a,b) Axial contour.
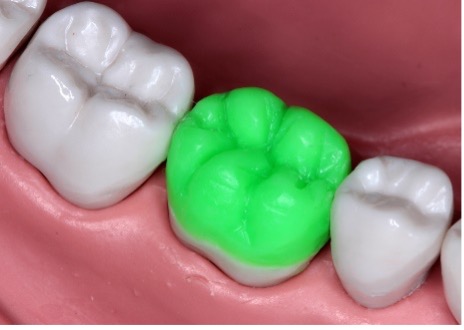
Figure 15.
LR6 primary anatomy.
Secondary anatomy may be introduced by carving accessory fissures to create triangular/teardrop-shaped cusp ridges using a half Hollenback carver (Figure 16).
Figure 16.
LR6 secondary anatomy.
Photograph and study the LR6 shape. The exercise may be refined or repeated by total or localised re-heating and re-carving, until opimal anatomical features are acheived.
Identical protocols may then be followed to help clinicians master the three dimensional anatomy of all other posterior teeth. These skills may then be applied clinically in restorative procedures.